Showing posts with label sewing. Show all posts

Wednesday, February 2, 2022

Leaf Me Alone (Final!)

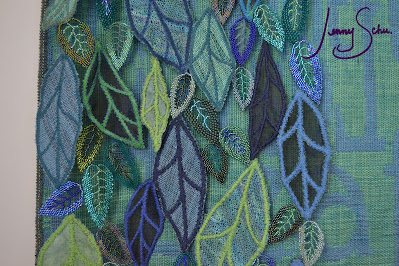
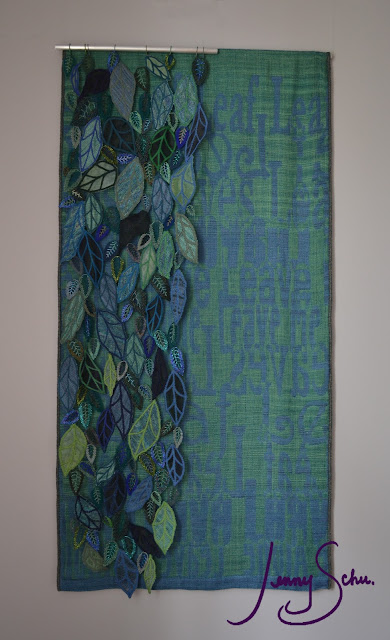
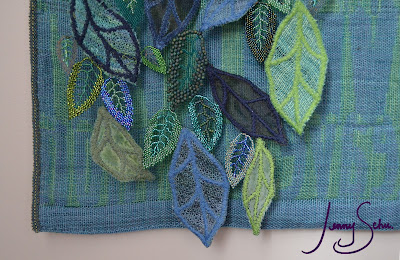
It's finished! This is the first sister-piece to She Can't See the Forest through the Trees and probably not the last.  December 30, 2019 is when I warped Delilah for this large Leaf Me Alone piece.  I have had lots of projects going on at the same time as I do with any large weaving (as you can see by all of my blog posts in the past 2 years!). I really need the extended time and mental space to get something like this piece finished properly. I finally got that with the second week we were in quarantine with COVID and then some solid full days-off that I set aside with goals to finish so that I could go skiing without stressing out about getting this done. 

dyed the warp and weft in 2014, I wound the warp in 2017...I have finally come to the realization that dying and creating warps en masse doesn't work for me. I need to do one piece at a time.  I'm quite tired of looking at blue and green at this point! I'm really excited to be able to get back to the piece with the really long name, particularly because it's grey and black.

When I get to a point on a big piece like this where I can see an end in sight, it's important for me to have an exhibit in mind to submit to so that I will spend all my extra time finishing it. The driving exhibit for Leaf Me Alone is with the Handweavers Guild of America's Convergence Conference, I submitted this to the Mixed Media exhibit, we'll see if the juror likes it enough to invite it to Knoxville this summer. It looks like I might be able to squeak it into some other submissions this year too (Michigan League of Handweavers Biennial Exhibit). 

I feel like I've typed at length about this piece. How it represents my need for creative quiet space and less busying myself with socializing or even leaving the house. I'm so much happier, more productive and at peace at home with my little nest of kitties and Bryan. 2 days ago I read the following from my "Meditations for Women Who do Too Much" book and it describes some of the feeling that this piece can allude to for me:
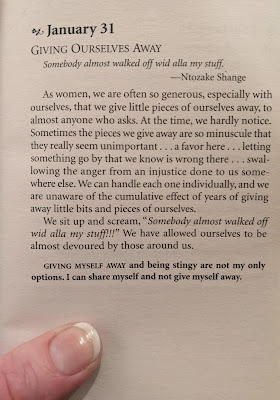
Exerpt from "Mediations for Women Who Do Too Much" 
by Anne Wilson Schaef, Revised and Updated Edition 

It's taken me nearly 40 years but "alla my stuff" that I cherish most is my personal time and taking care of my emotional mental space. I spent years of my life with "Leaf me alone" running, yelling in my head which turned into anger, sadness and resentment.  Now I make sure to take a lot of time for all the crazy that's in my head!! Luckily it comes out of my heart and finger tips as these new pieces of artwork.
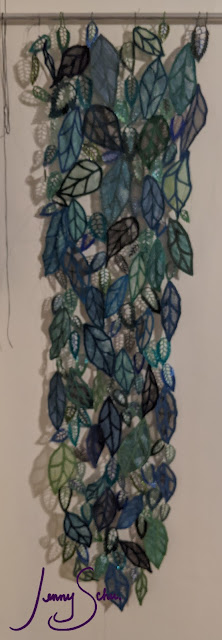
Leaf panel for Leaf Me Alone

Regardless of the emotion I feel behind my word pieces, I always hope that different viewers pull from their own personal experiences to relate to my works like these. We are all human experiencing things with very different stories or the same stories and we all have a huge range of emotions that need to bubble up and out.

All my Leaf Me Alone workings thus far....if you want to look into more ramblings. 

Monday, May 3, 2021

The Long Answer to "What are you knitting?"

    One of the projects that I keep in my purse to keep my hands busy is knitting my thrums.  I've been tying the short pieces of rayon thread together and knitting them into strips for a few years now. I currently, finally, have a definite reason to be knitting them. I get asked all the time "what are you knitting? (or making)" and this one is hard to describe. Fabric. That's the short answer...and this is the long answer:


    Thrums are the leftover pieces of thread or yarn left on a loom when the weaving has been cut off. They pull off the bars they were tied on to easily so I just throw them in a bowl of them that I have started. I began keeping them because I think they're just so beautiful, these little knots of leftover hand dyed rayon, and decided I'd just make more fabric with them.


    They knit up with a far different texture than the weaving they helped produce. I don't knit anything fancy, just open and loose knit so it ends up being a very stretchy open-knit fabric. 

Past knitted strips

The video I posted is a time-lapse of tying thrums together during a zoom meeting, knitting and then using the dissolvable fabric to make the knit strips into leaves.  It's another one of my tedious processes which is the kind of process I enjoy. Below you can see the difference between a leaf with the woven fabric versus the knitted fabric. It's quite pleasing to have some more texture.

Woven Leaf on the Left, Knitted on the Right


Tuesday, April 20, 2021

Cat Collars


I've toyed with the idea of making collars for the cats for a while. We have discussed at length how much Clark loves watching Bryan play Mario on the TV and how we should find him a Mario collar. Well, JoAnn's finally had some Mario fabric that we liked and I ordered break-away buckles and D rings for the project off of Amazon.


I didn't feel like getting too fancy, I just folded, pressed and stitched once seam.  Clark gets Mario/Luigi fabric.


I used the orange Star Wars themed fabric for Morgan's collar. (The cats did not want to model for photos)


And I used purple leopard print for Lois.  The break-away collars do work, Morgan managed to get attached to something at some point and tear his off. these seem to hold up as far as staying nicer looking on them. Collars usually get all fuzzy from the claws scratching on them, but the cotton fabric is holding up well. 


I haven't been blogging as much, work has been busy and I've been sinking into my knitting when I'm at home, or preparing for spring yard work and projects (I ordered windows to install in my garage! Woo!). I have 2 seminars coming up with the Michigan League of Handweavers Virtual Conference in May which I need to update and flush out those presentations/workshops. I'm getting the hang of this Zoom presentation thing, I was the Speaker for the Weaver's Guild of Kalamazoo's April meeting and had a little demo to go with it.  I'm finding that while we are doing these Zoom meetings I should take advantage of presenting from my studio by showing off the processes I'm using at the moment.  It's something that I rarely get to show or share live on these larger works, and I can talk and stitch or weave while answering questions or describing what I'm doing.  I think and hope that Zoom presentations of this magnitude will continue even beyond when we start to meet in person again.

Wednesday, April 7, 2021

Preparing the Extra Fabric from Leaf Me Alone (large) to make more Leaves


 I am continuing to attempt to follow the social media trend of posting video. It's much easier these days with the smartphones becoming higher quality and basic editing tools (ok, just cropping for me if I'm editing anything). Most of what I have for video is process work, so above (and on my YouTube Channel) is almost 20 minutes of me getting ready, sewing and cutting handwoven fabric to prepare to make stitched leaves for the second panel on my large version of Leaf Me Alone.


In the video I also rattle on about where and what I've learned about sewing with handwovens. Mary Sue Fenner is still the instructor that I think I learned the most from in only a 3-day period for sewing and how to take care of my sewing machine (which I also talk about in the video).  


My next post will be the stitching of leaves! I am also preparing to present at the Weaver's Guild of Kalamazoo Zoom meeting on April 12, 2021. The meeting starts at 6:30 (you can contact them if you'd like to join, I can email you the info if needed) and I start presenting at 7pm. I will be talking about my work which combines the many fiber techniques that I blend together for my artwork. There will be a heavy focus on the St. Petersburg Chain Stitch since I will be teaching a workshop with them in June. I will also do a demo of me working on this leaf panel as part of my presentation.  I can answer questions as I describe what I'm doing/stitching.  One of the cool things about presenting on Zoom is showing my process up close and live while members can ask questions about what I'm doing.  It worked out really well for the Fiberside Chat that I did in February!

Thursday, March 4, 2021

Sweatershirt to Pillow for Mom

Mom's Photo from the Texas Ranch

This winter I mentioned to my parents that my sewing skills have gotten much better with all the mask making I was doing. I had finally made "Halloween" (they're pretty permanent) pillow covers for our couch.  Mom then produced an old sweatshirt that I remember both of my parents wearing growing up and said she was hanging on to it to make a pillow but hadn't gotten around to.


I was happy to do it, and really this was the first thing I made on my sewing machine after finishing and packing up all of my mask making stuff.  It's for a 17 x 17 pillow which seems standard? I'm used to starting with a pillow and creating one to fit, but it looks like it worked without knowing for sure what size pillow was going to go into it. 


I had originally thought I'd do a brown or green piping for this piece, but when I took it to the store maroon seemed to be the obvious color to go with. I had no idea that it would also match the couch it was going to live on!


I needed to use as much of the length left of the back of the sweatshirt for the pocket overlap. I decided  it would be a fun detail if I kept the very top back of the sweatshirt as a nod to its previous life.  The above photo is a detail of the top back of the pillow which was at the top back neck of the sweatshirt. 


I think I'm getting much more confident in my sewing because I am usually much more nervous to cut into something that I cannot reproduce.  I didn't really have that issue here, and it came together pretty easily. 


The sweatshirt was a little thick in areas (like that top neck portion), so the back piece sewn to the piping was a little bit of a struggle.  In my world I don't worry too much about the back as long as it holds and looks pretty good.  This is good practice for something else I need to work on for our bedroom.  I'm glad to have to piping practice and it looks so great at my parents' place down in Texas. 


Wednesday, December 30, 2020

Bryan's Christmas Pants 2020

I spent a lot of time at fabric stores purchasing mask fabric this year.  Every time I had to actually go in to JoAnn's I noticed this Nightmare Before Christmas fuzzy fleece fabric.  I'm not usually a fan of this thick polyester stuff but I just kept thinking about what I could make for Bryan out of this fabric. I eventually realized that his comfy Storm Trooper pants were a little worse for wear and he could probably use another pair of fleece pants for around the house...this is the perfect project for that fabric! 

I picked up this pajama pant pattern from Seams Fabric called the Eastwood Pajamas by Thread Theory.  They have 3 options varying in difficulty for these pants, of course, I did the most complicated pattern knowing that I would learn something about garment making along the way. Bryan is really tall and pants are a hard fit for him, especially in a tall and skinny fit. While making these I added 3 inches to the length of the leg in this pattern so they wouldn't be waders like his other ones.

I usually think I know more than I do when I start making a piece of clothing. I read through the directions a number of times, looked for some videos online, tried to visually prep myself.

All the parts of the fly were really confusing to me.  I know that I need to follow the pattern line by line and that it'll eventually make {more} sense than if I was to try to do it without a pattern. I cut all the pieces I needed but I still wanted a better visual.  Thankfully Thread Theory has a blog and posts their pattern details. This particular post was SO helpful in making these pants: https://blog.threadtheory.ca/2018/08/08/eastwood-pajamas-sew-along-day-3/

Now since I was using much heavier fabric than the pattern calls for I had already decided not to create a button-fly, just one where the fly would open/be useful.  It still didn't make sense with all of the pieces but I pushed forward. I turns out I could do one less layer of fabric since I didn't need to hide a button in the fly, which is good because the fabric thickness was building up fast. 

(The really important thing on the above step was to stitch the rectangle panel only to the right edge of the inside hem, not through all the layers because that would close up the fly)


Pinning fly for top-stitching 


Pockets!

I was not going to put in the extra work into making the tie out of the same fabric. After looking at grosgrain ribbon options and other ideas I ultimately decided using the current fabric would be the best thing. I cut a 2-inch wide strip and folded it in on itself, pinned it and zigzag stitched it.


Button-hole stithced around the tie-holes

I still need to finish the bottom hem of the pants but I think they're a hit.

Wednesday, October 28, 2020

Zoom Workshop with David Owen Hastings

I'm so grateful and fortunate that as a member of the Ann Arbor Fiberarts Guild the board has worked hard to move meetings to Zoom so we can meet virtually.  They have also teamed up with the Needlework and Textile Guild of Michigan to share meetings, speakers and workshops.  This month NTGM had David Owen Hastings as their speaker.  After seeing some of his pieces I made sure to take work off for his lecture.  I really appreciate seeing someone's creative process and hearing them speak before I take a workshop with them.  I actually try not to take workshops very often because I can easily get distracted from my own artwork goals. I decided I needed something to look forward to on the day one of his workshops was being offered.  I happened to have that day off and it was dreary and raining so I couldn't work on my garage roof.  I have also been asked if I am willing to teach workshops on Zoom and I wanted to see how a workshop which is usually "hands on" would work in this manner.


After Mary R. posted her paper collage pieces on the Ann Arbor Guild's Facebook Member Page I talked myself right into this workshop that they were having again the following week.  I've done some sewing with paper in the past and I've never gotten too hooked on paper projects so I figured this would be safe to play for a few hours and put it down.  The above piece is the first one I created.  I love that I didn't have to go get anything extra for this workshop, we used stuff I already had at home and David's materials prep list had alternates for things if you didn't have them on hand.  Like I used post-its to frame up the strips on the base paper but I'm probably going to pick up some painters tape at work for ease of this particular process.  The above piece was my first one and I might have gotten hooked immediately.  Next I just wanted to see what the paper strips looked like I ruled notepaper; I didn't like it as much as seen below.


For my third little piece I went back to the brown paper bag square as a base, it's just a nice subtle background with a hint of texture. This workshop gave me a little nudge out of my 2020 studio-box of mask making and some weaving.  I've also been knitting in the evenings instead of beading, but that's not in the studio.


I have to admit I struggled with the second half of the class.  The process of cutting and turning and flipping pieces of paper until they looked satisfactory felt more like I was trying to make a puzzle work that wasn't meant to be a puzzle.  I solved part of my issue with a purple sheer vellum and called it good.  I'm fairly pleased with how the below piece turned out, mostly because I like the color pallet.


I recall as I was spinning and moving these pieces of paper around to make a thing, anything, that I could quit and be happy with the first portion and go back to playing with the strips which were easy for me.  Instead I pressed on because workshops are about a little bit of fun challenge and learning new techniques. As with many of my pieces, I thought "well I'm not doing that again" but as I let the process of flipping pieces of text around in paper, the thought occured to me that I could do this with a single text in my own work.  I do a lot of layering words and fonts in my weavings, I love to give viewers hints of words, jumble them so that people start to see what they relate to in word pieces rather than wondering what I'm getting at.  This process that David taught us is definitely going to transfer into my work at some point.  Something I didn't really feel like doing at the time ends up being a big "ah ha!" days, weeks later.


I also have to point out my big sewing take-away from David.  He uses a 1-inch strip of fabric to start and end the thread as he sews pieces on his machine.  Holy moly, I can't believe I've never heard of this before.  With all of my mask sewing (and now paper) this is going to be a thread and tension saver.  I love getting those random tips and tricks that will change the way you do something (machine sew) for ease and comfort.  That is a good reminder of why I need to take more workshops, the best way to learn is from each other.  

Tuesday, September 29, 2020

Diane's Gunmetal Mask, Dressy Masks

Diane's Gunmetal Mask, photo credit Bryan Johnson

Mask making continues for me this year and this request was really fun to work on.  Diane has a wedding to go to in October and requested a dressy mask to go with the outfit she's wearing.  I sent her a few fabric and bead samples, she picked one, and then I ran with it. 

Diane's Gunmetal Mask, detail, photo credit Bryan Johnson


I initially had thought about keeping the design super simple and just beading the edging of the mask.  I've been wearing a mask for 40+ hours a week since March and realized that having glinting shiny beads right in front of the eyes was not going to be comfortable, plus the glasses she wears.  So I started sketching some other designs.  Diane's outfit has some uneven or angled hem lines so I decided to use that idea, still keeping the beadwork simple. 

Diane's Gunmetal Mask, photo credit Bryan Johnson

I am in love with how this mask turned out!  If I have someplace dressy to go, I'll be making myself one also.  We're really not going anywhere until all this calms down though, so I don't see me needing one for a while.  This may be a little much for working at Home Depot. Ha.

Diane's Gunmetal Mask, detail, photo credit Bryan Johnson

I had a difficult time narrowing down the photos that Bryan took so you get a few different angles.  Yes, I'm wearing a wig, it's so much easier than doing my hair and I wanted to add a fun twist on these photos anyway.  I got it together in the nick of time for the Ann Arbor Fiberarts Guild's online COVID Mask Exhibit too. 

Diane's Gunmetal Mask, detail, photo credit Bryan Johnson

This mask has a partner, Diane's husband requested a "vineyard theme" mask and I took to Spoonflower to find designs.  Even though I don't drink anymore I couldn't resist this print and her husband liked this best too: 

Paul's Satin Vineyard Mask

I purchased the vineyard fabric in satin and the fabric is just delicious. You can find this design and others in Bags29's shop on Spoonflower.  Check out the link HERE.

Paul's Satin Vineyard Mask and Diane's Gunmetal Mask


Upcoming Local Show at Loewen Gallery in Williamston: Adorn

Loewen Gallery's   August Show is a break away from their usual beautiful quilts and is a juried show titled "Adorn"  The show...