Tuesday, March 31, 2015

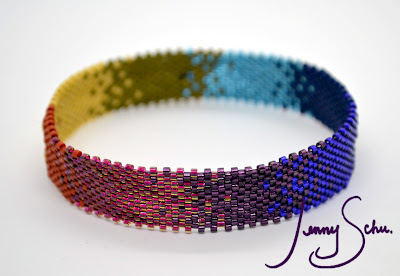
Leaf Bracelet Variation

Leaf Bracelet Variation $120.00

I have been meaning to start in on some different variations of leaf bracelets, and a new color combo got me inspired to do one.  I bought a fantastic shirt from my favorite Grand Rapids boutique, Lee & Birch and it go me moving my spring color collection to a little more pink and no lime green.


This piece as a two-pearl clasp, which I have been waffling on the size of the pearl, but it really hangs on well, so I'm going to be wearing it a lot to see how it feels. So far so good at the office yesterday.


I'm looking at these photos thinking to myself, "wow, that's a lot of pink for me to be working with." I must have spring fever, plus a ton of changes going on in my life.  Lets shake it up some hey?


You will probably be able to see this particular piece for sale at the Ann Arbor Fiber Arts Guild Fiber Feast on April 18th in the sales area.  I don't have anything in the fashion show itself, but I will be modeling.  Tickets are sold out, however, the general public is invited to shop early and after the fashion show.  More info at www.annarborfiberarts.org 


Thursday, March 26, 2015

3 Pairs of Beaded Earrings


I was inspired today to get a few smaller pair of earrings done for my Spring color grouping.  I started my day at Strange Matter Coffee.  I have been meaning to go there for a while and today was the prefect day.  I managed to run into 2 friends and made a new one who was working on her PHD at MSU.

Leaf Earrings with Orange Pearl accents $40.00

I have been meaning to get back to work and the pour over coffee at Strange Matter (and the atmosphere, and the music that I could relate to playing in the background softly) really helped.  I think I'm ready for my first jewelry swap for the Lansing Art Gallery.

Tiny Light Orange Open Pod Earrings with lime green accents  $35.00

Tiny Striped Pod Earrings $35.00

Monday, March 23, 2015

Shuto Con and Elf Ear Tips

Costume, Cosplay

Ok, so this was just a little learning experience that I had this weekend and a tip that I thought I should share.  I've been keeping myself busy and having too much fun with things I've always wanted to do. This weekend was the anime convention in Lansing, Shuto Con.  Every year I have observed thousands of costumed people running around downtown Lansing and thought: I want to be there.  I was into Sailor Moon in high school, in college there was an anime group that showed movies and tv shows once a month and then life got busy.  I've been playing catch up and one of my recent favorites is Sword Art Online.

As I waffled on buying a three day pass, I also was considering costuming.  I didn't have time to make something, but I do have LOTS of dress-up pieces. I decided a generic character from Sword Art Online (someone who would have definitely died, I've never beaten a boss in a video game, except maybe that first level of Mario on original Nintendo...).


So EARS.  I have had pointy ear tips since college, after using them for Halloween or something, I kept them in my makeup case. Hence, every once in a while when I was getting ready to go out dancing or to a concert, I'd put them on. They were just subtle enough that not everyone necessarily noticed. You're supposed to use Spirit Gum to apply these on to your ears, but I quickly realized that my skin was too sensitive for it and I spent a week or two with my ears swollen and itchy (it was awful).  Since then, I would just balance them over my ears and hope no one touched them....but they're pointy ears sticking out from under my hair, people can't help themselves.

I considered getting my ears pierced in the cartilage just for the purpose of keeping them on.  I have one ear pierced like that...it takes for ever to heal! Plus, then I tried to thread it through, it was hard, maybe I'll get better at it.  As I went though my wardrobe I ran into Matchsticks, a double-stick tape for clothing-to-skin application.  I thought, why not?  I cut them a bit smaller and just attached them in one spot a the top interior of my ear (triangular fossa area).  They stayed on all day, no issues.  I ended up out at a bar for a friend's birthday in costume afterwards and did have a few people tug on them (they did ask to touch them first), no issues. 

Also, at the end of the night, they came off easily, and the tape rolled off of the latex with ease. I remember having to get new ears on occasion because the spirit gum made them gross and sticky.

Add caption
Ears pre-makeup

Another tip on ears.  They come pretty light skin-toned. I saw a number of people at Shuto Con with this issue. All you have to do to get them the correct color is use a liquid foundation.  I applied it when they were off my ears, just with my fingers, it takes really well.

Lastly, Shuto Con was a blast. I can't wait for next year, talk about people who are SERIOUS about making costumes: 
Skeksis, the dark crystal
I met a Skeksis (and the panel was how he was MADE. So cool)


Me and Valeta


Up-close of another monster from the panel.


Her wings were folded up and then she pulled down on two grips to open them up!


I was just a Japanese school girl on Friday since my costume wasn't done.


Lots of light up pieces too. Hello #eTextiles!


Wednesday, March 11, 2015

ILLINI Bangle Bracelet


A while ago apparently I posted on Facebook that I wasn't making additional block M bangles, really it meant that I wasn't going to make a bunch to keep in stock, but I always love to do a commission.  A friend asked me about it and I told her I'd be happy to make her an MSU bangle, as we talked, she realized that I'm flexible, she's really, truly, an Illinois fan. 


So I pulled a bunch of bead options after looking up the colors and we narrowed down the blue and orange.  I picked contrasting finishes on the beads to add some pop and got to work on her piece.  I had drafted two different options for the lettering and she immediately picked the above design.

I love how excited she is about this bangle.  Plus we'll get together and chat over wine.  Lets make commissions fun!


Monday, March 9, 2015

Putting together Amy's Nilart Loom


Back in December my college roommate Amy contacted me to let me know she was ready to get her loom back together and weaving again.  I love helping my friends out with this sort of thing, especially when she has been off her loom for so long.  We started in on getting the loom together and Amy had to confess that she must have left a tupperware container with parts/shuttles/etc back at her rental.....7 years ago.  These were obviously long gone.  So as we put the loom together, we were missing the four pieces that connected the front beam to the castle, and the lever to advance the warp.

Castle

Shaded area of the missing part

I took measurements, but I really didn't think that I could re-create these parts with my level of woodworking knowledge.  So we turned to Charles at FORMA.  He deals Leclerc looms and could hopefully help us.  We called him first thing Sunday morning and headed over with pictures and the loom number.

We learned that it was a Nilart Leclerc, which was no longer in production.  Charles got our the above paper copy of the loom parts and took down what we were missing.  He had to call Canada, and they run on their own time up there, especially during the holidays. He promised to put the order in ans was hoping that they would have some of the older parts floating around for us.  

So finally, Amy got her pieces in from Leclerc and we got together last weekend. Leclerc still makes these parts, but for a different loom.  So the pieces were just a little too big to fit into the slots already in the loom. I had packed my toolbox and Dremel tool for this project.


Unfortunately my Dremel attachment was too wide to carve out the slot, and we only needed about one millimeter on either side to take down, some were easier than others,  My triangle sander fit in pretty well, but to get all the way to the back we had to get our fingers in there and sand out the interior. (Yes, I'm sure there were better ways to do so, but we were working with what I had on-hand).


Part #NA-111, almost in.


Finally together, at long last!

Double back beam.  I figured out the top break, but I need to compare to mine to fix up the bottom back beam break. Amy won't be using two beams...yet...


You can tell the new parts in the lighter wood.  Amy is oiling down the rest of the loom thoroughly since the poor thing has been sitting in storage.  I'm excited for her to get up and weaving again!


Tuesday, March 3, 2015

New set: Layered Necklace, Earrings and Bracelet


I'm not quite sure where the inspiration came from on this necklace outside of the fact that I have a bunch of 15/0 seed beads pulled for the colorway I'm using for my Spring 2015 jewelry.  I love doing the St. Petersburg Chain stitch with 15/0s and I've been rolling around an idea for a layered necklace for quite a while.

Layered Necklace $220.00

I'm not totally happy with the kinking that is happening with the stitch, but as it hangs, it'll work itself out over time...or I might steam it.  It does give this piece a very different look though.

Necklace detail

I first was trying to stitch accent beads into this necklace, but I had a hard time telling how it was going to hang.  So I grabbed my dress form and it made it so much easier! 

Trying to bead without the dress form.

Ah, now that's better.

Approved stopping point via social media comments.
(Thanks everyone!)

Test run, go dancing.

So I like to wear my jewelry in a normal setting to see how it wears and holds up.  I went out to see a favorite cover band of mine (The Cheap Dates) and while I was dancing I found this necklace to be really lightweight.  It didn't threaten to jump off from around my head, but it can end up around your back (if you bounce a lot).  It didn't tangle at all (yay!) and even though it wasn't laying just flat, it had a really nice look to it still when flipped (see above).

Earrings $45.00

I made the earring set to go with the necklace, these only take me about 2 hours to make (that's quick for my beadwork!)

Layered Bracelets; Plain $70.00
With Accent Beads $80.00

I have to say, posting to Facebook and Instagram have been helpful in  some decisions on the necklace.  I didn't want to go overboard with this first one, and your comments helped me figure out it was ok to stop and say the piece was done.  I also posted the below comparison image to decide whether to keep the bracelet "plain" or add in the pearls and accent beads.  I have to say that the responses were almost 50/50, so I made one of each.


The original bracelet design I put a lobster clasp on, but I really thought the glass pearls looked better, so I swapped the first one out and did a pearl on the second one too.  The plain bracelet took me around 3 hours to finish and adding in the accents were an additional hour.  I didn't time myself on the necklace, maybe next time.

Playing with Fire (Small Weaving)

I doodled these matches back in 2015. I had gotten divorced, I was out a lot and "playing with fire" was feeling like the best des...