Showing posts with label bead embroidery. Show all posts

Saturday, May 6, 2023

Abigail's Wedding Hair Pins

I dabble in bead embroidery when it's needed for specific pieces. In these cases I'm usually matching or complimenting some other design.  For example the bead embroidered Tiara piece that I created for Helen a few years ago. When some of my dear friends announce that they are getting married I offer to bead something for them for their wedding outfit if it calls for it. Not everyone takes me up on it, and if I don't think I can do what they want I let them know. 

Detail photo I was working off of from Abigail

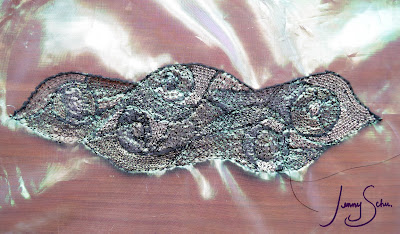
Abigail asked if it was possible to do some beadwork for her hair that went with her dress. She sent me plenty of photos of the beadwork on her dress and sizes of beads and sequins to work with. I wasn't sure I could do it since I've never worked with sequins before but I started researching and playing. As I went down the sequin rabbit-hole I found this fabulous website to purchase sequins


I stitched a few pieces at a time on one piece of satin

I compiled white, off white and silver beads from my stash along with ordering a few different sequins that I thought would hopefully work. I mailed the sequin samples to Abigail to compare to her dress...whites and the various finishes are so hard to photograph and guess at! Once I had enough information and color options I started stitching. 

I always think that I don't like bead embroidery but these were super-fun. I was really amazed at how well they clustered together in Abigail's hair for her wedding. Her hair dresser did an amazing job at making the ones she chose to use look like they were all one piece. Her hair dresser had requested I put them on 2 inch U-pins which I ordered from Amazon. 

Abigail's Wedding Hair!


We had such a great time at all of the wedding festivities and getting to catch up with friends old and new. I'm always honored to have something that I handmade as part of a friend's wedding. Thank you for including us and congrats Abigail and Juan!


Lastly, I loved photographing these. I wished I had a macro lens to really get better detail of the sequins and beads together.  I'm am by no means a professional photographer but I took a lot of photos as close as I could get.  The shapes drew me in. So this blog post has extra photos!


Tuesday, September 29, 2020

Diane's Gunmetal Mask, Dressy Masks

Diane's Gunmetal Mask, photo credit Bryan Johnson

Mask making continues for me this year and this request was really fun to work on.  Diane has a wedding to go to in October and requested a dressy mask to go with the outfit she's wearing.  I sent her a few fabric and bead samples, she picked one, and then I ran with it. 

Diane's Gunmetal Mask, detail, photo credit Bryan Johnson


I initially had thought about keeping the design super simple and just beading the edging of the mask.  I've been wearing a mask for 40+ hours a week since March and realized that having glinting shiny beads right in front of the eyes was not going to be comfortable, plus the glasses she wears.  So I started sketching some other designs.  Diane's outfit has some uneven or angled hem lines so I decided to use that idea, still keeping the beadwork simple. 

Diane's Gunmetal Mask, photo credit Bryan Johnson

I am in love with how this mask turned out!  If I have someplace dressy to go, I'll be making myself one also.  We're really not going anywhere until all this calms down though, so I don't see me needing one for a while.  This may be a little much for working at Home Depot. Ha.

Diane's Gunmetal Mask, detail, photo credit Bryan Johnson

I had a difficult time narrowing down the photos that Bryan took so you get a few different angles.  Yes, I'm wearing a wig, it's so much easier than doing my hair and I wanted to add a fun twist on these photos anyway.  I got it together in the nick of time for the Ann Arbor Fiberarts Guild's online COVID Mask Exhibit too. 

Diane's Gunmetal Mask, detail, photo credit Bryan Johnson

This mask has a partner, Diane's husband requested a "vineyard theme" mask and I took to Spoonflower to find designs.  Even though I don't drink anymore I couldn't resist this print and her husband liked this best too: 

Paul's Satin Vineyard Mask

I purchased the vineyard fabric in satin and the fabric is just delicious. You can find this design and others in Bags29's shop on Spoonflower.  Check out the link HERE.

Paul's Satin Vineyard Mask and Diane's Gunmetal Mask


Sunday, January 19, 2020

Helen's Tiara


Deadlines are important for me.  I had set to work on this peacock tiara for Helen and since bead embroidery doesn't always keep my attention I kept setting it down.  It's been a year.  When she requested that I get it to her before an event she wants to wear it to in February it started living next to the couch so I would pick it up a little bit every day after work.  I got it done this week and I'm meeting her tonight so she can finish this into a tiara. 


I know Helen through the Ann Arbor Fiberarts Guild which has Fashion show every year where Helen shows off her amazing vintage dance dresses at.  One year I told her if she was ever to want to part with a particular piece, to let me know.  Consequently, she did as it wasn't quite as long as she'd like.  So we have been working on a trade.  When she came to me with this idea I was excited to do it and she even had a design to work off of for the peacock feathers.  We got the size down and she gave me some vintage beads to work with.  I also used gold and silver from my stash to make it a versatile metallic piece to go with many of her outfits.

(back side detail)

I was very attracted to the amber colored vintage seed beads she gave me so I'm hoping it's not too brown-heavy.  I kept picking them out as I went along.  I'm happy to breath a sign of relief having this done early enough to give her some time with it.


I found two articles on Helen if you want to took into her more, I'm not sure she has a website (I'll ask tonight and update if so):


This is the piece that we traded for, it's just wonderful 
and I make sure I have occasion to wear it.  <3 p="">

I almost forgot that I wanted to do a weaving update too.  I'm about 8 inches along on the large Leaf Me Alone piece that I've been putting off working on for far too long!  I did a few small ones but its time to go bigger again.


Monday, July 27, 2015

Wedding Dress Bead Embroidery Details


Doing the beadwork on Katie's wedding dress has been my beading focus over the past 2 and a half months. You've probably noticed photos of it in progress on my Facebook, Instagram, Twitter, etc.  I'm really really happy about how the embroidered pieces turned out. Above is the focal pieces on the empire waist. (3 pieces all together).

The front of one shoulder.

The front of the other shoulder.

The back piece.

The back and should strands made me the most nervous, bead stringing isn't my forte.  Luckily Katie and her mom came over one afternoon and strung beads for 4 hours or so, which helped a lot.  Above isn't the greatest photo of the back, however, when the photos started coming through on Facebook yesterday evening, I was SO happy with how lovely the back and should strands turned out.

There was a lot of pinning and re-pinning.

At first I only made the shoulder pieces 4 inches long, 
I had to add another 2 inches to each side.

Should piece in progress.

Katie said she'd share some of the real photos of her in the dress with me, so more to come on the final look of the piece.  I wanted to get the details up before I forgot!

Sunday, July 13, 2014

Past Beadwork: Bead Embroidered Hair Combs

Sometimes I do bead embroidery, not very often, but lately while talking to some brides I've brought up the hair combs that I have made in the past.  They were made so far in my past that I don't have any images of them to reference on the internet.  So here's a little run down of some hair combs that I made and I still really like.

Layne's Hair Comb

Layne is a hairdresser that I have known since elementary school.  She initially thought she wanted beaded shoes, but she decided that she'd rather have hair combs for her and her bridesmaids (sisters).  I think it was an excellent choice, shoes get trashed at weddings (particularly outdoor ones) and that's a lot of beadwork to get dirty.


Smaller bridesmaid hair combs


Heidi wanted 2 hair combs with a long silk veil attached.  I made the veil with snaps so that she could wear the combs individually also.  the below comb had a match so that it fit on either side of her hairdo.  I'm particularly fond of gold, so I was excited to do a white and gold design for this commission.


In the same lines of hair pieces I also made Heidi's daughter's hair clip for her baptism.  The baby hair clip was much tinier with the smallest beads I can peyote stitch with, I blogged about it this winter HERE.

Tuesday, February 4, 2014

Magnetic Pin Cushion Tool Upgrade


I have had the pleasure of doing a lot more sewing and continually becoming more comfortable with my sewing machine.  I feel like as I use something more, I want more accessories for a new technique or piece of equipment.  I restrain myself until I'm really using something a lot though.  For example, I still haven't learned a lot about my DSLR camera, thus I will not be purchasing any fancy lenses until I have a full-understanding of this tool, but I'm really attracted to macro lenses and something for further away. All in good time.

The magnetic pin caddy is something I've had my eye on, but it seemed silly to spend $17-$20 on one when my pin cushion works just fine.  I keep noticing that others have them at workshops and when I wander around JoAnn's they catch my eye, but I just didn't have a good excuse to get one.


Then, over the holidays my husband and I were doing a total overhaul of our master bedroom which results in many, many, many trips to the hardware store.  While wandering around Home Depot, I came across the pseudo-stocking-stuffers area and there was a set of 3 magnetic trays by Husky for $5.  I didn't even have to think about whether or not it was worth the $5, I just put them in the cart.

These trays are actually even better than the ones I kept eyeing at JoAnn's.  The magnet is exposed, on the back and is extremely strong.  I like this because you can hold it over your carpeting after a pin and needle spill, and it picks them up.  Also, I have been adding beading to a heavily stitched piece and have been moving it around the house on my ironing board.  These trays not only stay attached to the ironing board while I'm moving it, but they are also strong enough to hold the fabric on to the ironing board so it doesn't move around.  I came across this by accident, and it's amazing. I'm no longer awkwardly pinning my work to the ironing board.

The only downfall of this product that I can find is that the magnet might be too strong for some applications.  Most of my needles may now be magnetized, I wouldn't lay my credit cards near it, that sort of thing.  But I am glad I ran into these before getting all accessorized from the overpriced items in the sewing isle.

Now back to beading...although some things call for bead embroidery, this is a gentle reminder-to-self that I've got about 20+ more hours to go on the beading details of this piece.  I stitch down every single bead, and that's my own anal-retentive issue, but it's much much slower than my usual peyote stitching.  I'm also really tired of looking at red seed beads.  I'll be switching it up, hopefully, soon.  The back looks nice and neat at least.


Thursday, September 22, 2011

The Things You Make Me See Despite the Weather; #1

In getting back to using one of my favorite weaving techniques, Theo Mooreman Inlay, I found inspiration in a hike that I did not want to go on.  The Olympic National park was beautiful, but I did not realize that there was potential for snow in May in the northwest.  I did two chilly hikes and saw much of the beauty that the Mountains of the Olympic peninsula held. 

I took a ton of photos of wonderful mosses close up and had the thought that I could use the layers in Theo Mooreman inlay.  The first image that I zoomed into and drew out, I love the design.  When I started to weave it in the Theo Mooreman technique, it was too dense.  I realized that I had drawn up a pattern for Tapestry, which I had been doing a a lot of.

So putting that cartoon draft aside, I continued zooming in to get a less dense but still interesting image and this is what I cam up with. 


I think I became attracted to the shape of this design because it reminded me a bit of my "Erte Inspiration" piece that I had done way back in 2005.  So I set to work weaving it and planned to have it done by the 2010 MLH Conference. 


It did hang at the Fiberart Exhibit at MLH, but the juror was pretty "meh" about it, and I actually am too.  So I no longer feel bad about not being too pleased with it and I plan on going back into it with more beads.


(This is the piece on the wall: meh.  Center: Fiberart by Marie Gile, Right: Tapestrey by Millie Danielson)

Something I have learned from this piece: Although bead embroidery is easy for me, I do not enjoy the sewing of beads as much as I enjoy the actual weaving of beads.  There are some things that I want to do with more bead embroidery though, so I'm still working to find a method of bead embroidery that works for me.

More Checkers [earrings]

Tan & Light Yellow Checker Huggie Earrings  can be purchased HERE I've felt a bit...overwhelmed and lost lately. I haven't gotte...